

Layout & Measuring
Large capacity calliper for big jobs
Use two "c-clamps" to clamp the legs of two 16" x 24" framing squares together around/across the object to be measured. Following this procedure, you can even use the scales to measure the distance directly.
Layout & Measuring
Transferring patterns for spindle turnings, legs, etc.
Attach a sheet of white paper (large enough for the pattern) temporarily to the wall.
Set the spindle you wish to duplicate vertically in front of the paper and very close to it. Position a bright lamp in line with the spindle so it casts a sharp-edged shadow onto the paper. Adjust the distance between the lamp and the shadow to achieve the sharpest shadow. Then, simply trace along the shadow with a pencil to transfer the pattern.
Finishing
Particle-free smoother for wood finishes Conventional abrasives and steel wools can, at times leave small abrasive particles or steel fibres in critical wood finishes during the smoothing process. When smoothing a finish that must be free of these particles, try using ScotchBrite pads, instead.
Sheet goods
Make-it-yourself carrying handle for sheet goods.
Cut a 1" x 1" rabbet along one edge of an 18" long piece of 2" x 2". Screw & glue your 2" x 2" flush with the bottom (18") edge of an 18" long x 8" wide piece of 1/2" or 3/4" plywood. The connection of the two pieces of stock should create an "L" and a 1" deep by 1" wide channel near the bottom of your plywood piece.
Near the opposite edge of your plywood piece, drill two 3/8" diameter holes, down about 1" from its top edge and about 4" in from each end. Slip the two ends of a 30" long piece of clothesline through these two holes and knot the ends to form a carrying handle.

To carry your 4' x 8' sheet goods, simply set the edge of your sheet into the channel formed by your plywood and 2" x 2", reach around and grab your rope handle and carry.
Miscellaneous tips
Invisible tambour canvas Unfortunately, the un-primed white canvas that's most often recommended for gluingup tambours (roll-tops) will easily show through between the slats when the tambour is rolled up and down. This is especially true on projects with dark coloured slats.
To solve this problem, use dark brown (or appropriate coloured) fabric dies to darken the canvas before assembling the tambours. Be sure it's completely dry and iron the canvas before gluing-up your tambour.
Band saw
Safely holding ultra-small pieces for band sawing Sometimes, it's necessary to cut extremely small pieces of stock that are impossible to grasp properly without getting your fingers well inside the red "safety zone"...where fingers aren't supposed to be! This problem can often be solved by guiding your stock with the eraser ends of two pencils.
Table Saw
Setting a saw fence parallel to the blade
Setting your rip fence so it's parallel to the blade could be a difficult task. If you have a Shopsmith MARK V, your owner's manual will tell you how to do this. If you don't have a MARK V owner's manual...or you're using another type of table saw, you can also make any necessary adjustments by using a set of inside callipers. Lock the callipers in position at approximately 6" apart. Touch one leg of your callipers to your fence face and the other leg to a selected blade tip where it meets the table surface at the FRONT of your table insert slot. Rotate your blade so the SAME tip is now meeting with the table surface at the BACK of your table insert slot. Adjust your fence setting or worktable so this distance is identical at both ends of your table insert slot.
Miscellaneous tips
Keeping machine pulleys from working loose
Machine pulley setscrews have a tendency to work loose at the most inopportune times.
To prevent this, replace your standard setscrews with two shorter ones approximating the length of your original. Tighten the first setscrew against the shaft of your machine or motor, and then tighten the second setscrew against the first.
Joinery
Fitting shelves tightly into dadoes If you own a thickness planer, here's a simple but important tip for making tightfitting shelf-to-cabinet fits. ALWAYS cut the dado or groove that your shelf is to fit into BEFORE you plane your lumber to thickness. By doing this, you can adjust your shelf thickness slightly to form a snug fit in the groove or dado.
Miscellaneous tips
Re-gluing edge splinters on projects.
Use a heated clothing iron to set yellow wood glue quickly when repairing splintered areas. Set the iron on medium heat and touch it to the glued splinter for no more than 30 seconds. Be careful not to get glue on your spouse's iron. A piece of brown paper grocery bag or a couple of thicknesses of cloth between the iron and the surface to be glued will help prevent this problem.
Gluing, assembly fastening
Drilling/sizing considerations for wood screws
Screw Body Drill Pilot Drills Counter bore size # size In soft In hard size* woods woods
4 1/8" 1/16" 5/64" 1/4"
5 9/64" 5/64" 3/32" 1/4"
6 5/64" 5/64" 3/32" 5/16"
7 5/32" 3/32" 7/64" 5/16"
8 11/64" 3/32" 7/64" 3/8"
9 3/16" 7/64" 1/8" 3/8"
10 3/16" 7/64" 1/8" 7/16"
12 7/32" 1/8" 5/32" 1/2"
*To accept standard sized dowels, plugs or buttons
When a wire wheel loses its cutting abilities
After a lot of use, a wire wheel can get dull and ineffective. The first and most obvious approach to getting more work out of it is to reverse its direction of rotation.
Usually, this will extend its life for a while. However, it will eventually become dull while running in this direction, as well. When this happens, reverse its rotation once again and run it against a coarse grit sharpening stone or grindstone to create sharp, new tips on the bristles.
Shop safety
Four table saw safety tips
1: Attach your push stick to the wall or the front of your saw with Velcro or stickybacked magnets so you can grab it quickly when needed.
2: ALWAYS use your saw guards and splitters to keep your hands clear of the blade and prevent the saw kerf from closing up on the blade and causing a kickback.
3: Try to avoid cutting crooked or warped stock, as it is much more likely to twist and bind during cutting.
4: When ripping, always be certain to feed your stock all the way past the blade until the cut is complete to avoid kickbacks. Use a push stick to keep your hands clear of the blade at all times.
Turning
Creating decorative burn lines on your spindle turnings -- without burning your fingers
Holding a piece of thin wire or coat hanger against a rotating, turned spindle has always been a great way to create darker accent lines around its circumference.
Unfortunately, it's also often been a great way to scorch the old fingers, as well. Next time, try replacing the blade on your coping saw or hacksaw with the wire. You'll get better control and won't have to worry about burning your fingers.
Gluing, assembly fastening
Giving your nails an improved grip.
Any "old-timer" woodworker will tell you that rosin-coated nails have a grip that just won't quit. Unfortunately, they're often tough to find.
To make your own, go to a local sporting goods store or bowling pro shop and buy a small package of powdered rosin. Mix 8 tablespoons of powdered rosin with a pint (16 ounces)of denatured alcohol and stir thoroughly until dissolved.
Drop in your nails and slosh them around a bit to coat them with the solution. Use a magnet to remove them from the solution (or pour or scoop them out). Then, spread them out onto a pile of old newspapers or rags and allow them to dry before use.
CAUTION: DO YOUR MIXING AND COATING OUTDOORS
IN A WELL-VENTILATED AREA THAT'S AWAY FROM ANY
OPEN FLAMES.
Gluing / assembly / fastening
Clamping cauls that won't stick.
It's often a good idea to use wooden cauls (small, scrap blocks) between the jaws of your clamps and the surfaces they will grip to prevent marring. However, if you're not careful, some "stray" glue could permanently fasten the cauls to your surface during assembly. Here are four ways to prevent this from happening: 1) use wooden cauls that have a polyurethane or other glossy finish on their surfaces 2) use 1/4" or thicker plastic pieces as cauls 3) place a piece of waxed paper between your caul and your work piece 4) wrap your caul in ordinary plastic kitchen wrap before use.
Gluing / assembly / fastening
Another "mashless" brad holder
Use a fine toothcomb to hold your brads while driving. Just slip the brad between the comb teeth, move it into position and whack fearlessly away with your hammer!
Inexpensive beeswax
Woodworking stores and special shops can often charge a fortune for the beeswax you use to lubricate wood screws, drawer glides, etc. Instead, visit your local home centre and purchase a wax toilet bowl seal. They're usually made of beeswax and a heckuva lot cheaper than the specialty stuff !
Finishing
Work piece holder
To hold your work piece off the bench surface during finishing and drying, try driving 4-penny finishing nails through small, 2" square by 1/4" to 1/2" thick blocks of wood until their heads are flush with the surface. Then, turn them over on your bench top and use them as "feet" to support your projects, suspended above your bench surface during finishing.
Gluing / assembly / fastening
Ready-made door shims
The next time you're making cabinets with flush-fitting doors and need some shims to hold them at a uniform clearance when positioning hinges, try using some "coin of the realm". In particular, nickels, quarters, dimes or pennies.
They're carefully minted to be of a uniform thickness and chances are, you already have some handy in your pocket or piggy bank !
Layout & Measuring
Marking Large Diameter Curves Or Arcs
Sometimes, it can be difficult to mark a large diameter curve or arc near the long edge a narrow board -- since there's no place (on the same board) where you can centre a string or compass. In those cases, an ordinary sash chain (or other small-linked chain) can be used. Here's how: Drive a nail or brad into the face of your stock at either end of your desired curve. Slip a chain link over the brads on either end and stand your board on edge so gravity will cause your chain to droop. Adjust your chain by changing the link on either end, allowing your arc to get larger or smaller. Once your desired arc is attained, mark a dot on your stock at each link or two. Remove the chain and your brads, then connect the dots.
Using A Router To Joint The Edges Of Long Boards
If you're joining a series of long boards together that may be too cumbersome to handle on a short-bet jointer, try using your hand-held router and a 1/4" straight bit. Start by laying all of your boards face down on your bench top or the floor in their proper orientation.
Leaving about 3/16" between each pair of boards, screw a wooden cleat across the backside of all boards, connecting them together at each end.
Turn your boards back over so they're face up and clamp a straightedge to them and adjust it so that when your router base rides against it, your 1/4" bit lines up with the first of your 3/16" wide spaces.
Turn on your router and make your cut, guiding your router base against the straightedge, cutting a clean, straight edge on two opposing boards simultaneously.
Reposition your straightedge and repeat this process at the spaces between each pair of boards.
Since each pair of mating boards is jointed at the same time, they'll fit together perfectly every time...even if your straightedge isn't perfectly straight.

Jointing & Joinery
"Shrinking" Dowels or Biscuits That Fit Too Tightly
The next time you're having trouble getting a biscuit or dowel to slip into its intended pocket or hole, don't reach for the sandpaper.
Although this method works great if you only have one or two biscuits or dowels, it can be very time-consuming when you have a lot of them.
When you find yourself in this situation, just "cook" your biscuits or dowels in the microwave for a few minutes. Chances are, they have enough residual moisture in them that the heat will shrink them enough that they'll slip right into place with little or no trouble.
Avoid Marring Work piece Surfaces
Even in the most well maintained shops, rough workbench surfaces (and metal filings or shavings) can often create dents, scratches and other blemishes on the underside of work pieces as they're being worked. To avoid this, it's always a good idea to cover your bench surface with sheets of newspaper or brown Kraft or butcher's wrapping paper before getting started. You might even look for an antique paper dispenser/cutter at a flea market and mount it on the side of your bench end so you always have a supply of paper for the job.
Router & Router Tables
Two Reasons NOT To Allow Router Bits To Bottom-Out In The Collet
First, bottomed-out bits will almost always make direct contact with the shaft of your router's motor...transferring the heat created by cutting directly to your motor's shaft.
This will tend to shorten the lift of your router motor.
Second, if a bottomed-out bit seizes in the collet (which frequently happens), you'll have to PULL it out with pliers, which can be difficult. If your bit isn't bottomed-out, you can tap it with a piece of wood, freeing it from the collet much more easily.
Stopping Work piece Slippage When Crosscutting Or Cutting Mitres
Making an accurate crosscut or mitre cut can be difficult if your work piece is slipping against the face of your mitre gauge during the cut. If you have a clampdown safety grip, this will solve the problem in most cases.
But, what if your work piece is too thick to be gripped by such a device?
In these cases, it's a good idea to glue or double-stick tape a piece of sandpaper to the face of your gauge to prevent this slippage. In fact, there are even special, non-slip strips that have been made especially for this job. The additional accuracy provided by this simple approach is especially helpful when cutting mitres.
Lathe / Turning
Smooth Sanding Lathe Turnings
Most turners smooth their spindle turnings on the lathe with sandpaper or steel wool.
It just makes more sense to do it this way.
However, unless you do it properly, you'll still have protruding wood fibres or "whiskers" when you've finished.
The secret is to smooth your turning once in the same direction. Then, turn your spindle around in the lathe, end-for-end (or reverse your lathe) and smooth it again while it's turning in the opposite direction.
By following this procedure, these protruding fibres will be eliminated completely.
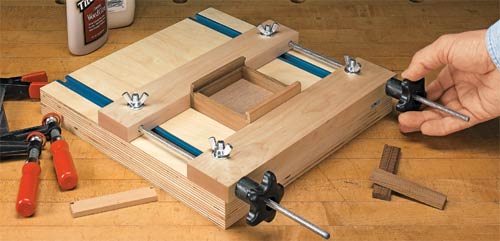
Clamps / Clamping
Giant, Make-It-Yourself "Clothespin" Clamps
Picture how a wooden clothespin is made.
Two pieces of wood with semi-circular cutouts that pivot on the "barrel" of a spring.
Now, imagine how you could duplicate this design to make some handy clamps. For example, start with a piece of hardwood stock, 3/4" thick by 2" wide x 12" long. Lay your stock on the bench top and drill a 1/2" hole through the 3/4" thickness, centred,
1" in from each side and about 4" from one end.
Next, rip your 2" wide piece in half from end-to-end, cutting through the centre of your 1/2" hole. This will leave a semi-circular notch in each of your two jaw pieces.
Cut a piece of 3/4" diameter dowel rod to a length of 3/4". Position your dowel rod in the semi-circular notches between the two jaw pieces to create a fulcrum point. Wrap a large rubber band around the short, clamping ends to apply pressure. Simple.
Three Ways To Improve The "Glide" Of Machine Table Surfaces
1: Coat the table surfaces with paste-type furniture wax
2: Rub non-medicated talcum power into table surfaces with a cloth
3: Sprinkle cornstarch on table surfaces with a saltshaker.
Jointer & Thickness Planer
Eliminating Jointer/Planer Tear-Out
If you're experiencing tear-outs when jointing or planing cross-grained woods, here's a trick worth remembering. Before making your pass over the knives, use a cloth or sponge to apply a light coat of water, raising the wood grain slightly. Let your water soak in for a minute or two, then make a light 1/32"
or less pass across the machine. If you're still getting some tear-out, repeat the process and allow the water to soak in for a little longer before trying again.
Gluing, Assembly & Fastening
Removing Stubborn Screws
Removing a stuck wood screw without damaging the head or breaking the screw off inside its hole can, at times, be difficult. A well-known "old-timer's" trick for making a simple task out of this otherwise difficult job is to first heat the head of the screw with a soldering iron. In most cases, it will then back out easily with little or no problem.
Layout and Measuring
An easy way to measure the distance between inside corners
The next time you need to measure the distance between two inside corners, try this trick.
First, measure-off an even number of inches from one corner towards the centre of your area and make a mark. It makes no difference how far you measure...1", 8", 18", 35", etc. Then, measure from the opposing corner to your mark and add the distance of your first measurement.
Sanding
Make-it-yourself round-nose sander
Sometimes, you need a hemispherical-shaped sander for getting into rounded areas of a project. This one can be made quite easily with a 3-1/2" long by 3/8" diameter carriage bolt, a couple of nuts and washers, a 1/2" thick wooden disc, a child's sponge rubber-filled ball cut in half and a piece of lightweight sandpaper cut into a disc with pie-shaped cuts made around the edges.
Make the wooden disc the same diameter as the diameter of your ball. Drill a 3/8" hole in the centre and attach the 3/8" bolt to the disc with the washers & nuts. Cut off the bolt head. Next, use hot melt glue to bond the hemispherical ball to the disc and allow to dry. Stretch your sandpaper over the ball with the pie-shaped cuts overlapping. Affix it to the edges of the wooden disc with staples or a hose clamp.
Chuck the end of the 3/8" bolt into your portable drill or drill press and go to work.
Bandsaw
Super-smooth resawing cuts
If you're trying to resaw thin strips of wood from not-too-thick stock (up to 3" or so) with a 1/4" to 3/8" wide bandsaw blade and find that you're getting rough cut surfaces...your problem is more than likely caused by the "set" in your blade's teeth.
You can solve this problem with the blade you have by squeezing the "set" out of your blade's teeth using a set of smooth-jawed pliers or in the smooth, metal jaws of a machinist's vice. By eliminating the "set", you'll have to feed your stock through the cut more slowly, but your final results will be smoother.
Finishing
Two work piece-holders for finishing operations
1: For long, slender work pieces such as legs, etc., drive an open-ended screw hook into one end of your project and use a wire or string to hang it from the ceiling joist from a swivel-type plant hanger.
2: For flat work pieces, make long, T-shaped supports by cutting a rabbet down both sides, along one edge of a 12" to 18" long piece of scrap wood...leaving a protruding "tongue" down its length. Position this tongue against the edge of the piece to be finished and attach it temporarily with a couple of brads.
These supports will act as "legs" to hold the surface of the piece to be finished off the surface of your bench top during finishing.
Then, just flip your work piece over to finish the opposite side.
Miscellaneous Tips
Router bit, shaper cutter or moulding knife makes custom-shaped "hand scraper"
If you've just used your router, shaper or moulder to cut a profile in a work piece but aren't quite satisfied with the smoothness of your final cut, remove the bit or cutter from your power tool and use it as a profiled "hand scraper" to smooth-out your cut.
Clamping
Sandbag veneer press
When you need to apply thin veneer to a project surface, you can often hold it in position while your glue sets up by placing pillowcases filled with (dry) sand on top of the veneer.

Miscellaneous Tips
Attaining wrinkle-free felt drawer/box bottoms
Start by cutting a piece of cardboard to the bottom dimensions, less about 1/32". Lay a piece of felt on your bench top with the sized cardboard on top, positioned in one corner.
Be sure your felt is large enough to extend about 1/2" beyond the two corner edges.
Cut the other two edges to the same 1/2" overlap with a SHARP artist's utility knife and straightedge.
Next, cut a 45-degree notch out of the felt in each corner. Spread a strip of quick setting craft-type glue around the edges of the cardboard and wrap your felt around and into the glue strip, pulling all the wrinkles out as you go. Don't pull too tightly or you'll "bow" the bottom.
Once everything's set up properly, apply a dab or two of glue to the backside of your cardboard and drop it into position in your drawer or box bottom.
Sanders
Cotter-pin sander/polisher
The next time you need to sand the inside of a hole or a small radius, try this trick.
Slip a piece of sandpaper or steel wool through the two halves of a large cotter pin (at the rounded end) so the abrasive extends about 1" beyond each side of the pin. Chuck the pin into your portable drill or drill press and go to work.
Jointer & Thickness Planer
Clean boards save knives
Dirt and grit on the surfaces of boards can dull planer or jointer knives quickly.
Before planning or jointing old or soiled boards, clean their surfaces thoroughly.
Wipe dust, mud or soil off surfaces with a damp cloth and allow to dry. If you suspect embedded grit such as sand or stones, wire brush all surfaces prior to planning or jointing.
Radial Arm Saws
Matching kerfs make cleaner cuts
The saw kerf in the surface of a radial arm saw table controls the smoothness of the cut you make. Over time, this kerf keeps getting wider and wider, thus providing less back-up for your work piece and more splintering on each cut. You can solve this problem by filling the kerf with epoxy-based wood filler or auto body filler.
Allow the filler to dry and pass your saw's blade through it slowly, making a new kerf.
Sanders
Quicker replacement of palm/pad sander sheets
Cut a sheet of plywood that's the same overall size and thickness as the pad on your sander.
Wrap your new sheet of sandpaper around the block and crease both ends of he paper nicely over the block before installing it on your sander.
Finishing
Applying a finish to the inside of small, hollow bowls or vases
Instead of struggling with a tiny brush that will reach inside your vessel, try blowing it out thoroughly to remove all dust and chips.
Then, pour some finish into the vessel, slosh it around a bit to coat the sides evenly, and pour the extra back into your container of finish.
Gluing, Assembly & Fastening
Router squeeze-out removal
The next time you're building a project with lots of assembly...and lots of potential glue squeeze-out, try this trick. Attach two 1" wide strips of equal thickness clear plastic or Lexan to opposing sides of your hand-held router base with double-stick carpet tape. Insert a 3/8" or 1/2" straight bit into your router, adjust the depth-of cut so your bit barely touches the wood surface, and run it across the squeeze-out areas, removing it completely.
Sheet Goods
Splinter-free cuts on plywood
To prevent splintering when cutting plywood on a table saw, place the "god" side of the plywood up on the table. Set your saw blade to make a cut about 1/8" deep on the underside and make your first pass. Re-set your blade to cut through the plywood, protruding about 1/4" above the surface and make the second and final pass.
Picture Framing
Saw table picture frame clamp
If you need a clamp for a small picture frame and don't have one handy, use your table saw.
First, unplug your saw. Drop a 3" high piece of stock into your mitre gauge slot (usually, these slots are 3/4" wide, so use 3/4" thick stock). Lower your saw blade below the table surface, cover your tabletop with waxed paper (to keep the glue off) and place your frame between this protruding piece of stock and your rip fence. Slide the fence in toward the protruding stock until it touches the ends of your frame pieces.
Apply glue to the corner joints and drop the opposing two pieces into position. Apply pressure across these opposing pieces with bar clamps and allow your glue to set up.
Cutting & Sizing
Truing the edges of irregular boards
Often, we get boards where neither edge is straight and true...making it difficult to rip to an accurate and consistent width. You can solve this problem by first attaching a known straight-edged piece wood to the top surface of your stock near one edge with a piece of double-stick carpet tape. Use a hand screw to apply momentary pressure at various points along the taped edge to assure good adhesion.
Remove the hand screw and guide the straight-edged piece against your saw's rip fence to true up the opposing edge. Remove the taped-on strip, flip your stock over and rip the opposing edge straight and true.
Sanding
Attaching Abrasive Paper To Contoured Sanding Blocks
Sometimes, it's necessary to make specially contoured hand sanding blocks for smoothing out the shaped edges of cabinets and furniture projects. Some examples might be drop-leaf joints, ogees, beaded edges, etc. To do this, we have to make "mirror-image" sanding blocks with coved or rounded-over edges. Once the block is created, abrasive paper must be attached to it. Unfortunately, this paper can lose its abrasive properties quickly and could require frequent replacement before the job's done.
One way to solve this problem is to mount your abrasives to the blocks with special "feathering disc adhesive" used by auto body repair technicians to hold abrasive discs to air-powered rotary or block-type sanders.
Available at auto paint stores, this special adhesive remains tacky under use, allowing the worn-out sandpaper to be removed and replaced a number of times.
Toy-Making
Creating Accurate Toy Wheels
Often, toy wheels can be made by simply slicing them off the ends of wooden dowels. However, this process can sometimes yield wheels that are slightly "wedgeshaped"... being thicker on one side than on another. This problem can be avoided by making a simple cutting jig out of a block of wood. For example...if you're making 3/4" diameter wheels, drill a series of 3/4" diameter holes through the edge of a 2" x 6" piece of scrap stock...being certain your holes are perfectly perpendicular to the edge. Insert 6" lengths of your 3/4" dowel rod into the holes, then saw through the 2" x 6" (and your dowel rods simultaneously) with your table saw.

When finished, simply pop the short lengths of dowel from their holes in the jig. They will be of aconsistent thickness from side-to-side -- PLUS -- they will have smooth, splinter-free edges, as well.
Miscellaneous Tips
Preventing File Tooth Clogging
If you're filing soft metals (such as aluminum) and resinous woods (such as pine), you may find that the teeth of your file are clogging-up frequently. To avoid this, rub your file first with a piece or ordinary blackboard chalk.
Plastics
Smoothing The Edges Of Cut Plastics
Once you've cut the edges of Plexiglas, Lexan or similar plastics, you'll more than likely discover that they're not as smooth and clear as they were before they were cut.
To remedy this problem, clamp your cut piece carefully in a vise with the cut edge facing up.
Fire-up your propane torch and pass a flame lightly and quickly back-and-forth over the cut edge several times until your saw marks disappear. For best results, be sure not to get your flame too close...or to dwell in any single spot for too long.
Shop Set-Up
"Hearing" The Phone Over Running Machinery
It's hard to hear the ring of a phone over the noise of operating woodworking machinery. Your local Radio Shack store has a solution...in the form of a little device they call a "Phone Flasher". Just attach it to any phone line and plug in a light. When the phone rings, it will flash the light, alerting you to the ring.
Scroll Saw & Jigsaw
Convenient Blade Storage
Scroll Saw & Jigsaw blades can be conveniently stored in short lengths of small diameter PVC pipe. Seal one end with a PVC cap and the other with a removable cork. Use a marker to write blade sizes, etc. on the outsides of your pipes.
Sanders
A "Non-Skid Parking Lot" For Your Orbital
Or Pad Sander
Most power sanders won't come to an instantaneous stop when they're turned off.
As a result, when you flip them off and set them down on the benchtop, they could easily scoot off the bench and onto the floor. By keeping a small piece of carpet on your benchtop, you'll have a place to set your sander when you turn it off...without fear of it scooting off the benchtop.
Gluing, Assembly & Fastening
Non-Clog Glue Bottle Tops
The tops of glue bottles are notorious for clogging-up after they've set for awhile.
To prevent this, replace your glue bottle "snouts" with those from dish detergent bottles -- the kind that pushes down to seal and pulls up to open.
Gluing, Assembly, Fastening
Soda Straw Glue Cleanup
To remove glue squeeze-out from an inside corner of an assembled project, try using a plastic soda straw. Just force the straw into the corner and run it along the edge.
The open end will scoop-up the glue like "magic".
Clamps & Clamping
Improving the grip of wooden vise jaws
Grasping dowels, threaded rods, pipe and similar round objects in the jaws of a vise without slipping or damaging the object you're holding can be tough. And, if the only vise you own is a woodworker's vise, its smooth jaws make the job even tougher.
This problem can be solved by first inserting the object to be gripped into a piece of rubber or plastic hose before grasping it in your vise. You can use garden hose,surgical hose, automotive radiator hose, etc. Just match the hose size to the object.
You'll get a great grip, won't damage the threads of your threaded rod and won't mar the jaws of your wooden vise.
Miscellaneous Tips
Magnetic tool/accessory holder
Whether you're working with a Shopsmith MARK V or other brand of tool, it's always handy to have your set-up tools (such as chuck keys,
Allen wrenches, etc.) nearby for changing bits, blades and similar set-ups. One way to do this is to attach a strong magnet to the machine, near the area where these tools will be used.
If your tool is made of aluminum or other non-magnetic materials, attach the magnet with double-stick tape. Old loudspeaker magnets are great for this, as are some of the new "rare Earth" magnets that are available at Radio Shack stores.
Hand Tools
Protecting the tips of chisels
Nicked chisel edges are worthless. To protect the sharpened tips of your bench chisels, try cutting small slits in old, discarded tennis balls, racquet balls or handballs.
Then, just insert the tips of your chisels into them to prevent those troublesome nicks.
Gluing, Assembly, Fastening
Pegboard nailing protectors
Cut 9" long x 1-1/2" wide strips of ordinary pegboard to use as protectors when nailing project components together. Just drop one of the holes in the pegboard strip down over the head of your nail and onto your workpiece surface before driving your nail home. If you slip with the hammer, you'll hit the pegboard instead of your workpiece surface.
Layout & Measuring
A time-saving tool-maker's trick
Tool & die makers use steel "one-two-three" blocks to save time on layouts and setups.
These blocks are exactly 1" thick, 2" wide and 3" long. Woodworkers can also benefit from such blocks. Just make them out of hardwood such as maple or cherry and keep them nearby for fast tool set-ups (such as setting rip fences) and layout jobs (like marking off even distances for dowel holes, etc.
Hand Tools
Small, make-it-yourself nail-puller
Ordinary hammer claws are often just too big and cumbersome for removing small brads, tacks or finishing nails. But you can make a claw that's perfect for the job by using a small, triangular metal file to create a small "claw" in one of the regular claws on your full-sized hammer. This will give you "a claw within a claw" that you can use the next time you have to pull a small brad, nail or carpet tack.

Bandsaw
Make-it-yourself bandsaw tire cleaner
It's a fact that Bandsaw tires will last much longer if they're kept clean. You can make a simple, self-cleaning system for your tires from a couple of old discarded toothbrushes.
Just cut the handles off to about 3" long, heat them up with a candle or torch and bend them to a 90-degree angle. Then, simply screw them to the inside of your bandsaw's "cabinet" so the bristles ride constantly against the tires' surfaces during operation..."sweeping" the dust and debris off as you work.
Shop Set-Up
Rust preventative drawer liners
The number one enemy of hand tools is rust.
To keep rust to a minimum, line the bottoms of your bench and tool chest drawers with scraps of short-pile carpet. Lightly coat the carpet with 10-weight machine oil or WD-40. This will help minimize the dangers of rust on your tools.
Routers / Routing
How to make varying depth rabbets with a single bit
You can easily adjust the cutting depth of your bearing-piloted rabbeting bit by merely changing the diameter of the bearing pilot.
The outside diameters of the bearing pilots on different style bits can vary significantly, while most of these bearings have the same center hole diameter. Just switch to a larger O.D. bearing for a shallower rabbet....and a smaller O.D. bearing for a deeper rabbet.
Gluing, Assembly, Fastening
Holding flat surfaces together during glue-ups
Often, two boards can slip & slide when they are clamped together, surface-tosurface.
One way to prevent this is to drive a couple of very small brads into the surface of one board, then cut off their heads at a sharp angle, leaving about 1/16" protruding above the board's surface...with a sharp point on each. Then, apply the glue and lay the mating board in position on top and tap firmly with a wooden mallet or the heel of your hand to "impale" the top board on the bottom one, preventing any slippage.
Finishing
Spray bottle stain applicator
Spraying is a great way to apply an even coat of stain on a project. But, if you don't have a compressor and sprayer system, what are you to do? Try using a squeezehandle-type plastic spray bottle like those that come filled with window cleaners, cleaning detergents, etc.
They make a great applicator for stains, as well.
Gluing, Assembly, Fastening
Hand screw edging clamps
If you don't own a set of specialized, 3-way clamps for gluing solid wood edging to countertops or plywood shelves, try this trick. Just use your wooden handscrews and some 1" thick wooden wedges. Apply glue to your edging and place it in position.
Clamp a couple of handscrews to the shelf or countertop so their threaded screw rods are 3/4" or so away from your edging material. Then, drive your wooden wedges between the edging and these screw rods to force the edging against the shelf or top while the glue sets-up.
Gluing, Assembly, Fastening
Gluing small, hard-to-clamp pieces
Sometimes, it's necessary to glue components together where a clamp just won't reach. In these instances, try spreading your glue over all but one small spot on your mating pieces.
Allow the glue to set up for a couple of minutes, then apply a small dab of hot melt glue in your "open" spot and press your pieces together until the hot melt sets-up.
Cutting & Sizing
Simple handsaw tricks
Handsaws will cut differently, depending on the angle at which they're held while you make the cut. For fastest cutting, hold your saw perpendicular (at a 90-degree angle) to the workpiece surface. Be aware that this technique will result in a fairly rough cut.
For a smoother, general-purpose cut, hold your saw at a 45 to 50-degree angle. For the smoothest cut, swing your saw to a shallow 15 to 20-degree angle to the workpiece surface. This approach, will, however, require considerably more time to complete your cut.
Sanding
Make-it-yourself contour hand sander
A deck (or two) of old playing cards can make a great contour sanding block for moldings and shaped edges. Just wrap a piece of sandpaper around the long edge of your deck(s) and grasp the opposing faces/backs. Press the deck edges into your shaped edge and sand away. It's important that you use sandpaper with a thin, pliable backing when performing this operation as stiff-backed papers won't conform properly.
Routers / Routing
Super-smooth cutting router bits
The next time you need super-smooth edges on a shallow mortise or cut, try using metalworking end mills. They usually have four or more flutes and will therefore produce very smooth edges when you're making shallow cuts. Be aware, however, that their flutes are very shallow and not good for clearing out waste as they cut.
That's why they're best reserved for shallow cuts or final edge smoothing.

Hand Tools
Make a rasp from old saw blades
A fast-cutting wood rasp can be easily made from a series of old hacksaw blades. Just alternate the direction of the teeth and bolt them together through their attachment holes.
Use two to four blades to make a really narrow rasp for those tiny jobs....or an inchhigh stack (or even more) when you need a wide rasp for removing a lot of stock in a hurry. For a handle, try wrapping one end with duct tape.
Ted's Woodworking - Guide eBook
Handsaws will cut differently, depending on the angle at which they're held while you make the cut. For fastest cutting, hold your saw perpendicular to the work piece surface.
ReplyDeleteNice Website..!! We alsp Manufacturers and exporters of rotary peeling lathe machine, rotary veneer lathe, veneer rotary lathe, face veneer peeler, face veneer peeling, rotary peelar Yamunanagar in India
ReplyDeleteYou provided a superb tutorial regarding woodwooking tips and tricks.Each and every step is clear and easy to understand.it's just fantastic!
ReplyDeleteIf you are method is manufactured out of metal and several other non-magnetic items, fix on that magnetic field through double-stick cassette. Classic loudspeaker magnets can be beneficial to it, simply because can be the various unique "rare Earth" magnets that can be found within The airwaves Shack sites.
ReplyDeleteOften, two boards can slip & slide when they are clamped together, surface-tosurface.
ReplyDeleteThanks for sharing your experiences. I found a lot of useful information there. I love wood working. I often use wood router and table saw for my project.
ReplyDeletereally great information, I'm a woodworker, I really love this job. there are many details I can not do. but after reading your post I understood. Everything seems easier than I thought.
ReplyDeleteIt is nice and very informative post. Everyone can search easily on
ReplyDeletegoogle service.
Nice tips! Very useful. I found a lot of useful information there
ReplyDeleteGreat article and a good read! I didn't know scotch brite can help smoothen the wood - I always rely on sandpaper. Glad to know there's an alternative!
ReplyDeleteYour ideas are very useful. Actually one of my friends is planning to work in this field, so I’ll definitely recommend your post to him. Many thanks to you.
ReplyDeleteI'm a woodworker but there're many details I can't do, but after reading your post, I understood.
ReplyDeleteThanks for sharing your experiences.
Woods are the special attraction for every house. It gains popularity day by day and used in different structures such as; furniture, flooring, decoration, and many others. Here also, we can get some essential tricks on woodworking and how these are getting popular in different homes. I would like to follow the tips and tricks from here to learn some basic use of woods. Thanks for such a wonderful post.
ReplyDeleteIn this article I will offer my more than 20 years involvement in the hose reels business to ideally offer you the best hose reels counsel so you can be equipped with the best data when you make your buy. https://www.homyden.com/mexican-bean-beetle-identify-prevent-get-rid-mexican-bean-beetles/
ReplyDeletePositive site, where did u come up with the information on this posting?I have read a few of the articles on your website now, and I really like your style. Thanks a million and please keep up the effective work. cutthewood.com - woodworking tutorials
ReplyDeleteThis product program enables clients to examine the woodworking outlines in more detail. You can even alter or make your very own wooden plans with this product program.some more ideas
ReplyDeleteReally detailed explanation that's hits the nail on the head.
ReplyDeleteFor power tool reviews I recommend a site like Tool Inspector as they have a great selection of reviews that are detailed and honest.
Tool Inspector
ReplyDeleteGreat article and a great read! I failed to realize scotch brite can help smoothen the wood - I continually depend upon sandpaper for business coaching. Glad to recognise there's an opportunity!
ReplyDeleteGreat wroking with woods. I'm also an architecture and using the mitersaw tool to work with wood.
ReplyDeleteThank you for sharing this great woodworking article. I have shared the same information on Versatile language
ReplyDeleteThank you for sharing this great woodworking article. Its too helpful.
ReplyDeleteThanks for sharing man
ReplyDeleteHey, Thank you for sharing it.
ReplyDeleteAmazing article. I also want to learn writing.
ReplyDeleteI read all of your articles and even subscribed to your website also but still, I m not getting any updates, Can u please educate me I will really appreciate it.Kissasian Drama
ReplyDeleteI read all of your articles and even subscribed to your website Beyhadh 2 also but still, I m not getting any updates, Can u please educate me I will really appreciate it.
ReplyDeleteThat’s really good idea to do projects and run business. Thank you for telling us about this tool.Pinoy Lambingan
ReplyDeleteThat’s really good idea to do projects and run business. Thank you for telling us about this tool. Kissasian Dramas
ReplyDeleteThis is The Way TO Write Something Unique And You're Doing a Good Job AM Impressed That's Awesome OFW Pinoy Channel. I Love To Visit Daily On Your Website Stay Blessed.
ReplyDeleteCool, Its the best idea to establish and progress any business. Thank you for describing us about the best tool. Pinoy Tambayan Channel
ReplyDeleteAwesome Buddy Thanks For Sharing This.IF You Need Indian Network Episodes Join Our Website Bigg Boss 14.
ReplyDeleteThank you for sharing your useful woodworking tips! I needed the tips with the bandsaw. They helped me a lot!
ReplyDeleteThank you for sharing this great woodworking article.
ReplyDeleteWoods are the special attraction for every house. It gains popularity day by day and used in different structures such as; furniture, flooring, decoration, and many others. Here also, we can get some essential tricks on woodworking and how these are getting popular in different homes. I would like to follow the tips and tricks from here to learn some basic use of woods. Thanks for such a wonderful post.Pinoy Lambingan
ReplyDeletereally great information, I'm a woodworker, I really love this job. there are many details I can not do. but after reading your post I understood. Everything seems easier than I thought.kshows
ReplyDeleteGreat, Its the best idea to establish and progress any business. Thank you for describing us about the best tool. Trim Router
ReplyDeleteNice information. Check out Best Angle Grinders for Woodwork.
ReplyDeleteI appreciate every bit of your efforts to let us know about the topic. In fact, we’re going to study and research it as part of a half-yearly initiative supported by our website and group of partners.
ReplyDeleteYou make so many great points here that I read your article a couple of times. Your views are in accordance with my own for the most part. This is great content for your readers. Trade Central
ReplyDeleteI high appreciate this post. It’s hard to find the good from the bad sometimes, but I think you’ve nailed it! would you mind updating your blog with more information? Best IS in london
ReplyDeletenice information
ReplyDeleteIn the event that that is the situation with you and you need your home to be your heaven however you can't manage the cost of it then a home improvement credit can help you in your mission. Ramen en deuren Leuven
ReplyDeleteIt is likewise unlawful to endeavor catching and delivering numerous creatures. Deltona Pest Control
ReplyDeletePretty good post. I just stumbled upon your blog and wanted to say that I have really enjoyed reading your blog posts. Any way I'll be subscribing to your feed and I hope you post again soon. Big thanks for the useful info. Rectify
ReplyDeleteExcellent .. Amazing .. I’ll bookmark your blog and take the feeds also…I’m happy to find so many useful info here in the post, we need work out more techniques in this regard, thanks for sharing. Waste removal wolverhampton
ReplyDeleteBlood suckers spread through dress and stuff of voyagers and through used beds, bedding, furniture and clothing. Specialists accept that the reason for the ascent in kissing bugs are because of an expansion in worldwide travel and versatility, the restricting of DDT alongside diminished utilization of metropolitan pesticides. Pest Control Orlando
ReplyDeleteWith that sort of mounting weight on the significance of establishing a decent connection, here is the way you can establish a surprisingly better connection with your clients and potential clients when they stroll into your store. racking system supplier
ReplyDeleteTo change a tree sign into something that will be wanted, you will require tools.Woodworking tools
ReplyDeleteNatural furniture are produced using naturally developed sources and are handled naturally too - these household items are generally strong wood furniture, just that the wellspring of the wood are naturally developed, prepared and made to guarantee that the completed item holds the characteristic excellence of regular hardwood. LED swing chair
ReplyDeleteThe primary thing you would need to check is that the handyman has a substantial permit. This is the lawful grant to function as a handyman. A handyman with a permit is your confirmation that you are working with somebody that has gone through the vital capability systems and is accordingly not a quack.this website
ReplyDeleteGood post but I was wondering if you could write a litte more on this subject? I’d be very thankful if you could elaborate a little bit further. Appreciate it! home inspection in Hamilton
ReplyDeleteIn the event that you several creepy crawlies in your carport and a couple in the kitchen, the time has come to get on the web and discover how you can deal with stop the arachnids before they turn crazy. Orlando Termite Treatment
ReplyDeleteIf you love disposable cannabis vapes but you wrorry about children mis-inhaling the cannabis.Simply TWIST with child lock design will be your good choice. TWIST is the most reliable child-resistant disposable cannabis vape on the market. Read more at disposable cannabis vape pen
ReplyDeleteI will appreciate you sir, because this is an informative and helpful article for me, I am going to learn something form here because i am very interested in wood-working.
ReplyDeleteOrganizing will assist with facilitating the cycle of your home deal insight since potential issues can be distinguished and tackled before they are spotted by likely purchaser. coastal lighting
ReplyDeleteHome stagers use certain arranging procedures in an organized home that carries out a plan firmly all through the home. moroccan furniture
ReplyDeleteThis is an amazing post about woodworking, I love your woodworking.All of your tips is very helpful and valuable for me because i will do little woodworking at home sometimes. great post
ReplyDeleteAssessment charges from a guaranteed proficient home investigator by and large beginning under $300. A normal cost for a 2,000 square foot home broadly is about $350-$375. mulberry silk sheets
ReplyDeleteTheir affection for the Home Building Profession, and the pride they have in their homes will be apparent. Presently, the crucial step, tracking down a "Home Builder with Passion". moroccan tile
ReplyDeleteStagers give exceptionally close consideration to the little subtleties of promoting a home that a homeowner might have not have seen or has become used to seeing and doesn't understand any expected issue. nova city housing project
ReplyDeleteThis record is composed for the homeowner to comprehend the city examinations. This article isn't alluding to the outsider assessment finished by an authorized Professional Home Inspector. Tajarat strives to be Pakistan's biggest real estate developer ever, guaranteeing the highest international standards, prompt execution, and lifetime customer loyalty. For further detail visit
ReplyDeletetajarat.com.pk
I have been checking out a few of your stories and i can state pretty good stuff. I will definitely bookmark your blog download free woodworking plans
ReplyDeletegreat and interesting post about home garden plans. nice article.
ReplyDeletepower tool
It helps realtors take care of their work all the more viably when the home is flawless, coordinated and appropriately organized
ReplyDeleteföldmunkagép szállítás Europa-Road Kft.
Ensure the individual directing your test has been prepared to The National Environmental Health Association (NEHA) or The National Radon Safety Board (NRSB) guidelines. Pure silk bedding
ReplyDeleteHome garden is not just a place for our pets, but a place for our children to play. According to experts of Dissertation Writing Service, if every house had 20 square feet of greenery, about a quarter of the world would be covered with gardens.
ReplyDeleteYour content is very helpful for me because it related to my favorite hobby. I am learning woodworking and get ideas from different site. Also, your site is very important for me. besides that, we will shift to new house and have plane to make a garden.
ReplyDeleteESD Wrist Strap is a basic and widely facility in ESD equipment usage, which is very convenient for workers to operate and enables them to ground while working on the Sensitive Electronics. It is compose of wrist loop and grounding wire, the wrist loop is contact with skin directly. Here's information about anti-static wrist strap, read on to know.
ReplyDeleteIf you want to ship a car or motorcycle to Finland, you must plan to go to the customs office in Finland to clear your vehicle. Any vehicle entering Finland must be in compliance with the U.S. or European vehicle exhaust regulations.Shipping from China to Us
ReplyDeleteAttempt to add extra amusement regions to your home.silk sheets
ReplyDeleteEstimation, string count, texture content, producing procedure, and weave are variables to be viewed as when buying bed sheets.real silk sheets
ReplyDeleteTajarat strives to be Pakistan's biggest real estate developer ever, guaranteeing the highest international standards, prompt execution, and lifetime customer loyalty. For further detail visit capital smart city lahore
ReplyDeleteYour information is a beneficial. That's great to read this blog, you are a great and having the terrific skills. Really considerable, thanks for sharing this terrific blog. Burn off oven
ReplyDeleteWhat a well written and compassionate article. I found your ideas and wisdom encouraging and helpful. blue world city Islamabad location
ReplyDeleteSmmcart provider is one of the highest-rated Smmcart in the market. Watch your traffic grow to new heights when you select our SMM services to increase your engagement, video ranks, and follower count on all your social media accounts. If you are thinking of buying Real Tiktok Views Likes Followers, Facebook, YouTube, TickTock, LinkedIn, Likes, Twitter Comments, Likes and Views, then today is the right place for you. In this article, we are going to discuss this Real Tiktok Views Likes Followers in detail.
ReplyDeleteSince home organizing prescribes to the dealer to take care of remembrances and resources for arranging purposes, they are remained careful from anybody visiting the home. silk bed sheets
ReplyDeleteConsistently in the country, more than 80% of all homes are sold with the help of a realtor. Indeed, even individuals that begin endeavoring to sell all alone ultimately go to a realtor. reformas integrales zaragoza
ReplyDeleteStagers make incredible supervisors for an open house when they have organized the home.
ReplyDeletearquitecto zaragoza
Home organizing adds tone to a home that can carry on like "sight to behold" making the home more alluring.
ReplyDeletelimpiezas zaragoza
Over 80% of Real Estate Agents are currently prescribing home arranging to their customers. In case you are not arranging your property, another person in your area likely is! https://europa-road.eu/hu/foldmunkagep-szallitas-debrecen.php
ReplyDeleteIt gives a space a fit and brought together feel that will engage more purchasers. Victorian lights
ReplyDeleteStagers give extremely close consideration to the little subtleties of advertising a home that a homeowner might have not have seen or has become used to seeing and doesn't understand any likely issue. пръскане срещу комари
ReplyDeleteFor some people home decor may involve several thousand dollars while it just takes some imagination by some people to make magnificent changes. https://shuttlesky.in/
ReplyDeleteIt can cause a more established home to feel more modernized.
ReplyDeletePotential purchasers will think your in a rush to sell your home in case you pass on it vacant.pintores en zaragoza
A quality stager keeps on remaining taught with the most recent plan patterns and land showcasing methods and will execute these procedures when staging.pintor zaragoza
ReplyDeleteHome stagers are generally extremely imaginative naturally and can inventively orchestrate specific bits of goods or fine art to make a new examine a home.Silk bedding
ReplyDeleteFollowing 3 months their home was still available to be purchased without any offers. Silk Robes for women
ReplyDeleteTherefore, mustard yellow is a shading that you ought to have in your home. It pervades a positive and inventive environment in the home.Silk bed sheets
ReplyDeleteIn the event that you purchase a fresh out of the plastic new home, you should burn through cash on improving the check allure of the property. Silk bedding
ReplyDeleteIt depersonalizes a home which will eliminate the current home proprietor's character and cause the expected purchaser to feel more comfortable.Brisbane Plaster Pro
ReplyDeleteSince 100 percent silk is all regular, our bodies love the way it feels against our skin. silk pajamas for men
ReplyDeleteMost frequently it is a purchaser who demands a review of the home the individual in question doesn't generally mess around with buying. roof repair in duluth ga
ReplyDeleteAssuming you have a ton of windows in your home, this might be an incredible method for setting aside some cash.
ReplyDeletehttps://www.westseattlewindowcleaner.com/window-cleaning-seattle-low-cost-and-high-quality
How long does emergency care take? Depending on the severity of your illness or injury, waiting times can vary significantly. Most patients have a wide range of symptoms and the waiting time can vary from three hours or more. Whatever the reason, you should always expect to spend time with a doctor or nurse, not just a machine. Going to an emergency care center will give you the treatment you need at a low cost and without the hassle of waiting a long time in a traditional hospital. Read more at urgent care.
ReplyDeleteWhat's more, a real estate agent would have in no time notice the very serious late installment punishment. Any specialist would have forewarned Allison, of not asked Allison, to contemplate if this would be a fair arrangement for her, truth be told. antibacterial chopping boards
ReplyDeleteThanks for sharing this Interesting blog. How to Recover a Hacked Roblox Account. and you Forget your Roblox account password? Use our Roblox Password Finder tool to get your lost password without any delay.
ReplyDeleteGreat post. Thanks for sharing. Keep it up. If you want to know how to unlock new packs like Token, Shoe Pack, Contract Pack, Basketball Pack. Then go and unlock new packs with the help of locker code NBA and share your experience.
ReplyDeletewood working is a science and very few are the real scientist, great tips and tricks, i usually buy all my furniture online https://grace-international.pk
ReplyDeleteonline
ReplyDeletewood working is a science and very few are the real scientist, great tips and tricks, i usually buy all my furniture online
ReplyDelete< a href="https://rbsland.com/nova-city-islamabad/">Nova City Islamabad is a master-planned community in the twin cities that focuses on a more sophisticated way of life with a greater emphasis on health and family living
ReplyDeleteHero MotoCorp, an acclaimed Indian bike producer, offers a various lineup of bikes in Bangladesh. For cutting-edge charges and model availability, it's far recommended to go to their respectable internet site or contact local sellers for the maximum updated statistics. Find more information Hero Bike Price.
ReplyDelete