
Close isn't really good enough. A perfect fit is what counts.
When building furniture, there are many ways to construct joints. The simplest are those that use mechanical fasteners, like nails and screws.
While these are sometimes appropriate, they're not often used in first-class work, especially in visible areas. What's preferred is a direct joint between parts, bonded with glue.
Of course, the type of joint you need depends on a variety of factors, like the nature of the materials being joined, the function of the joint, strength and appearance requirements, what machinery and equipment are available, and your own level of skill. Whole books are devoted to this discipline–and most are far from comprehensive because the possibilities are almost endless. In light of this, joinery can certainly seem intimidating to the beginner. But it doesn't have to be. By mastering two primary joints, the edge joint and the mortise and tenon, you can build an astounding array of furniture.
Edge Joints
The first requirement of a good edge joint is that the two mating surfaces must fit together perfectly. This means there are no discernible gaps. Second, the mating surfaces must be either on the edge or the surface of a board. End grain is not a candidate for edge joining because of its open cellular structure. When glue is applied to these cells, they act like straws, pulling the glue deep into the wood instead of leaving it near the surface where the bond takes place. When end grain must be joined to edge or face grain, the joint of choice is the mortise and tenon. More on this later.
For edge joining, the mating surfaces must be flat and square to both faces of the board. To achieve this, first scribe a straight reference line on one surface, using a long straightedge. Then clamp this board to the side of your worktable and use a bench plane to flatten the edge. Check your progress relative to your reference line frequently.
And check for square frequently with a combination square.
Once you're satisfied with the edge on the first board, repeat the same process on the mating board. When you've flattened this edge, lay the two boards together on a flat surface and check for fit. Usually some additional work will be required to get a perfect joint. When you've achieved it, just spread glue on both mating edges (Photo 1) and clamp the boards together until the glue sets.
Doweling
One common problem with edge joining is that the glue often acts as a lubricant between the boards. This can cause the boards to slip when clamped, which makes it difficult to achieve a flat joint. There are three common solutions to this problem: dowels, joining plates and splines.
Because the last two require some fairly specialized equipment, dowels are the best choice for the beginner. All you need for the job is a drill and a doweling jig.
For standard 13/16-in.-thick stock, 1/4-in.-dia. x 1- in.-long dowels are a good choice. Start by laying out the dowel locations every 6 in. to 8 in. along the joint. Next, install the 1/4-in.-dia. bushing in your doweling jig and center the hole in the jig bushing over your first mark. Tighten the jig in place and bore a hole in the edge.
Make sure that the hole is deep enough to allow a 1/16-in. space at each end of the dowel for excess glue. Repeat the same procedure for all the holes along the joint.

Keep in mind that birch dowel stock, in 36-in. lengths and in diameters from 1/8 in. to 1 in., is commonly available at hardware stores and lumberyards. When using this material, it's a good idea to cut a narrow groove down the length of each piece to create an escape route for excess glue. You can use the corner of a sharp chisel to scratch the side of the dowel. You also should slightly bevel both ends of the dowel with a piece of sandpaper. This bevel makes aligning the dowels in their mating holes easier. You can also buy readymade dowels from mail-order suppliers.
Once your dowels are cut to size, spread a thin layer of glue in all the dowel holes and along the edges of the mating boards. Then gently tap the dowels into the holes (Photo 4). Next, align the mating board so the exposed dowels meet their corresponding holes and use clamps to pull the joint tight. Tighten the clamps slowly to allow any excess glue to escape and leave the joint clamped until the glue sets. Mortise And Tenon As mentioned earlier, the mortise-and-tenon joint is the best way to join end grain to long grain. The tenon is the male portion of the joint that is cut on the end of one board. It's designed to fit into an identically sized slot, the mortise, in the mating board.
Beginners often avoid this joint because the skills required seem out of reach. But if you take care in layout and cutting, you can easily achieve good results. Of course, it's always a good idea to practice on some scrap wood first. The tools you'll need are a combination square, marking gauge, drill, doweling jig, backsaw and sharp chisel.
To lay out the joint, begin by marking the tenon shoulder line. This represents the length of the finished tenon, which is usually 1 in. to 1 1/2 in. long. Use a square and pencil to extend this shoulder mark to both sides and edges of the board.
Next, set up your marking gauge to scribe the tenon width on the center of the board end. For 13/16-in.-thick stock the tenon is usually 3/8 in. thick with 7/32-in. shoulders on both sides. But a 5/16-in.-thick tenon with 1/4-in.-thick shoulders is also perfectly acceptable. Scribe these guide lines across the end grain and down the two edges till they meet the shoulder line. Clamp the board in place with the joint end pointing up and use a backsaw to cut along the guide lines. Be sure your saw kerf always stays on the waste side of the line, and stop cutting when your reach the shoulder mark.
Next, clamp this board flat on your worktable and use a backsaw to cut along the waste side of the shoulder line. When this cut is complete, the waste should fall from the side of the tenon. Repeat the same process for the other side of the joint. Then use a sharp chisel to pare the sides of the tenon (often called the cheeks) down to the guide lines.

Most tenons also have shoulder cuts on the top and bottom edges. To cut these, first lay out the guide lines using a marking gauge. Then cut along the length of the tenon using a backsaw and finish by cutting along the shoulder line on both edges. Set the tenons aside for the moment and begin working on the mortises.
Use the marking gauge and square to mark guide lines for the mortise in the mating boar. Because cutting a mortise requires accurately removing a great deal of stock, a drill and doweling jig are your tools of choice. Just insert a bushing in the doweling jig that matches the width of your mortise. Then clamp the jig onto the board with the hole centered between your layout lines. Slide the drill bit into the bushing and bore a series of overlapping holes until all the waste is removed.
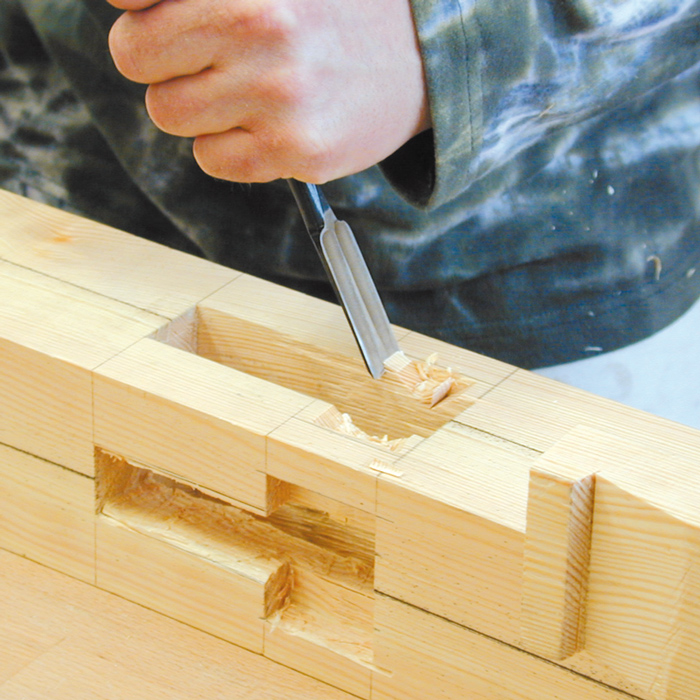
For the best results, set the hole depth on your drill bit by attaching the collar that comes with the jig to the bit. The hole should be 1/16 in. deeper than the length of the tenon. This provides some space for excess glue that would otherwise keep the joint from closing completely. Once all the holes are bored, square the ends and the sides of the mortise with a chisel.

Next, test fit the joint. The tenon should be snug in the mortise, but you shouldn't have to force the parts together. If the joint is too tight, carefully pare the tenon cheeks with a sharp chisel until the fit is correct. If you need to remove just a bit of stock, use sandpaper. Once you're satisfied with the fit, apply glue to all the mating surfaces, and slide the pieces together. Clamp the assembly securely until the glue has dried.
Ted's Woodworking - Guide eBook
I like this post. Thanks for sharing woodworking guide. Keep posting such blogs. I’ll keep coming back and will suggest you to my friends as well.
ReplyDeletethompson
Thanks for sharing your experiences. I know that making the Joinery is one of the basic skills of a woodworker. It requires high accuracy. It is a big challenge to beginner.
ReplyDeleteLooks great. I like this wooden DIY project very much. Your coffee table look so cute. I’m doing some research on DIY projects. I want to do something like that for my family. But I have no idea now. Thanks for sharing your idea.
ReplyDeleteYou write very detail about Doweling. It's useful for me. I'm doing same project, thank you.
ReplyDeleteI always consider woodworking similar to baking - you can't second guess and there are no "rough estimates". You really have to be detailed and keen to all details.
ReplyDeleteI love wood working. This is a great guide for me. Thank you so much
ReplyDeleteIt would be a waste of money if you just buy tools in woodworking without knowing their functions because the tendency could be, tools that you may buy can be useless in your future woodworking projects.
ReplyDelete1 inch thick plywood
Sometimes we tend to forget to clean the gardening equipments after used, and we'll find some problem when we want to use them in the future. Here are some best tips which you can use in cleaning the gardening equipments. adirondack chair
ReplyDeleteThanks for sharing such a useful woodworking guide! I had a problem with edging joints but you solved it in this post.
ReplyDelete