
Of all the activities involved in furniture making, sanding has to be the least popular. It's always messy and irritating, and usually tedious and frustrating. This is true for the beginner and expert alike and probably is the result of nothing more sinister than bad timing. After spending so many hours in stock preparation, joinery and assembly, most of us just want to get on with the finishing so we can see the piece come alive. Unfortunately the road to a good finish passes through a lot of sanding.
The most common abrasive material is sandpaper. It's generally sold in full sheets that measure 9 x 11 in. It's also available in discs and belts of various sizes to fit both portable and stationary sanding equipment. But for the beginner, the flat sheets are all you need.
Sandpaper is manufactured with various abrasives on the surface, each with a preferred use. Garnet paper is a fast sanding variety that's best suited to working by hand.
However, it's not terribly durable. If you plan to use a palm sander, like the one we show in our basic toolbox, you'll need a longer lasting, tougher abrasive. Aluminum oxide paper is the best choice for this application.
When it comes to the finishing stage of your project when you need to sand between finish coats, silicon carbide paper is the best bet. It holds up especially well in the finer grits.
All of these sandpapers are rated by the coarseness of their abrasive particles. You can find papers ranging from a very coarse 40-grit up to an extremely fine 1500-grit. But for general work, grits that range between 100 and 320 will do the job.
Sandpaper is also classified by the type and weight of its backing material. Both paper and cloth are used for this purpose, but paper is by far the more common. When you look at the back of a sheet of sandpaper, you will see a code describing the grit of the surface and the weight of the backing. The weights are classified from A to X, with A being the thinnest and most flexible backing. For hand sanding, A-weight paper is appropriate, and for an orbital sander, C-weight paper is best.
Finer-grit papers are also available with water-resistant backings. These are usually classified as wet/dry abrasives. They're most often used to level finishes like varnish or lacquer, before the final polishing. In wet
sanding, water is used as a lubricant to keep the paper from clogging.
The general sanding rule is to move from coarser to finer grits in sequence, until you reach the desired finish.
For most applications, you should start sanding with 120-grit paper. This should remove any scratches or other defects, like subtle planer marks, from the surfaces of the wood. But if your stock is particularly rough with pronounced, clearly visible planer marks, then you should start with 100-grit paper. In rough conditions, you can also save a lot of tedious sanding time by first lightly hand planing the surface.
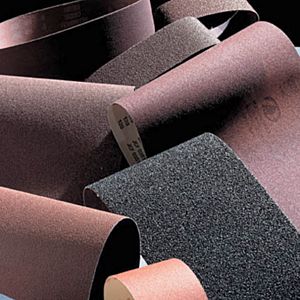
Basic abrasives are (clockwise from top left) garnet paper, aluminum oxide paper, silicon carbide paper, wet/dry paper, steel wool and abrasive pads.
A good sequence of grits for most surface finish applications is: 120, 150, 180 and 220. But if you choose a penetrating finish, like the oil finish we used on our console table, then you should finish up your sequence with 320-grit paper.

To use these papers, simply cut them in half lengthwise and wrap them around a block of wood or cork that measures about 3/4 x 3 x 4 in. Be sure to thoroughly remove the dust from your project after each grit. This is
necessary because some abrasive is always broken off the backing during the sanding process. If these larger pieces are not removed, they will continue to abrade the surface at a coarser grit while you're working with a finer one.
Machine Sanding
When you have a lot of sanding to do, particularly when the stock is very rough, an orbital palm sander is the tool of choice because it's much more aggressive and less laborious than hand sanding. When using this tool, always move it parallel to the grain of the wood.
Don't apply pressure to the machine–simply let its weight do the work.
Move it slowly and evenly along the length of the workpiece, overlapping each stroke by one-half the width of
the sanding pad. The coarsest grit should eliminate all visible scratches and defects. The succeeding grits only
need to remove the scratches left by the previous paper. As with hand sanding, be sure to remove all the dust from the workpiece between grits.
Plan Of Action
It's a good idea to plan your sanding before assembly. This is particularly important where two parts join to form an inside corner. If you wait until after assembly, the sanding becomes much more difficult.
Once the piece is assembled, make sure to ease all the edges. This creates a clean, crisp appearance and greatly reduces the chance of splinters breaking off the edges. To do this, hold your sanding block at a 45 degrees angle to the edge and sand across the edge, perpendicular to the grain. Don't sand along the edge, which would be parallel to the grain. These short crossgrain strokes give you better control of the block and make it easier to achieve a uniform edge.
Remember, whenever you sand wood some dust is created, and this dust can be harmful if inhaled. Even power sanders that have dust collection attachments are never 100 percent effective. Always wear a dust mask when working to protect your lungs.
Other Abrasives
While sandpaper is the furniture maker's primary abrasive, there are others that come into play on just about every project. Steel wool is one. It's inexpensive, flexible and can be used for a variety of tasks. It comes in four grades: No. 0 (the coarsest), No. 00, No. 000 and No. 0000 (the finest).
The two finer grades are the ones that are used most often in furniture making. They are employed to smooth finishes between coats and to polish the final finish coat. And on pieces where you plan to use a penetrating oil finish–instead of a surface finish like varnish–you can burnish the wood before finishing with No. 000 and No. 0000 steel wool. This will polish the surface of the wood to a soft shine that will be visible even after the oil is applied.
Another abrasive option is a nylon abrasive pad, which can be used for the same jobs as steel wool. The pads come in various grades, each identified by a color. Red pads are coarse, green are medium, gray are fine and white are extra fine. While steel wool pads tend to be more aggressive, the nylon pads have a much longer life. You can even wash them out and reuse them when they become soiled.
Other abrasives include powdered pumice and rottenstone.
These are ground stone materials used for the final polishing of surface finishes like varnish or lacquer. After
the finish is completely cured, just sprinkle a small amount of pumice on the surface and add enough water to make a paste. Then, using a felt pad, simply rub the mixture across the surface parallel to the grain. Once a uniform satin finish is achieved, wipe off the pumice with a damp cloth and dry the surface. If you want a high-gloss finish, repeat this process using rottenstone and a new felt cloth.
Ted's Woodworking - Guide eBook
Sanding is an important part of furniture making and also the most tedious part. There are several reasons for which sanding is done, and the first & foremost reason is to make the surface & edges smooth enough. Generally, while sanding the sandpaper is used. However, as the author has stated you can opt for a machine sanding, if you have a huge stock which is very rough you can choose an orbital palm sander as a tool because it is more aggressive and less laborious compared to hand sanding. While sandpaper is very popular as an abrasive there are also alternatives like steel wool & nylon abrasive pad which are also used very often.
ReplyDeleteHaro flooring